
Showing posts with label House. Show all posts
Showing posts with label House. Show all posts
Monday, 10 December 2012
Best 5 Fall Wreaths to Purchase This Season
Monday, 1 October 2012
7 Ways to beat the high costs of home building

Friday, 28 September 2012
7 Easy Ways to Make Your Kitchen Healthier

Thursday, 27 September 2012
10 Tips to Get Perfect Deal at a Farmers’ Market

Sunday, 24 June 2012
Inventive ways to beat the heat on a budget

Keep curtains and shutters closed.
During the day this keeps the sun from streaming directly in. If it's still warm, invest in dark or heat-blocking curtains -- a cash outlay, yes, but surely cheaper than several months of steep AC bills.
Don't leave windows open.
Except at night. That's right -- open your windows at night to let in cooler air and shut them first thing in the morning (preferably before the sun comes up) to lock in the cool air and beat the summer heat.
Hang wet sheets in front of windows.
Some summer nights just don't cool down and the house still feels suffocating. Apartment Therapy puts forward a novel idea for beating the summer heat: wetting sheets and hanging them in front of open windows. The outside air blowing in through the wet sheets creates a cooling effect that's much cheaper than air conditioning.
Create cross ventilation.
To do this you need several cheap fans. Experiment with their placement to generate the best cross breeze. If you have windows on opposite sides of a room, position one fan to pull air into the house and another to push hot air out. For an additional dose of coolness, Lifehacker suggests placing a bowl of ice in front of a fan; as the ice melts the fan disperses the cool evaporation into the room. It's not air conditioning, but it does provide some relief from the summer heat.
Turn off and unplug everything.
Every appliance (big and small) puts out some heat when it's running. If you aren't using an appliance, turn it off and unplug it. Additionally, avoid using big appliances when it's really hot outside. Cook on the grill instead of the stove and hang laundry out to dry instead of running the dryer.
Hang out in the coolest parts of the house.
If you're home during the day, beat the heat by staying out of it. A basement will undoubtedly be cooler than the upstairs, so park yourself (and the kids) down there. In the late afternoon, when the sun hits the west side of the house, move to a room on the east side.
Use plants to cool off.
Plants certainly can't come close to replacing the AC, but they do produce slightly cooler air to help you beat the heat this summer. This goes for plants indoors and out. Yes magazine says placing trees and tall plants, such as grapevines and sunflowers, around the outside of the house helps block the heat, which in turn helps lower AC bills.
Finally, leave the air conditioning off when you aren't home. Cheapism's picks for the best inexpensive air conditioners come with 24-hour timers, so you can set them to turn off automatically at the time you usually leave for work.
If the tips above aren't enough to beat the summer heat, here are our recommendations for the best budget room air conditioners:
- For a small space of 150 square feet or so, the Kenmore 70051 (starting at $160) may be all you need. Reviewers say it's easy to install and use, and it outdoes bigger, pricier units in features and energy efficiency.
- The Frigidaire LRA074AT7 (starting at $159) is exclusive to Lowe's and can cool up to 250 square feet. Both consumers and experts call it quiet and effective in online reviews.
- An area up to 350 square feet can benefit from the LG LW8012ER (starting at $220). Consumers praised the performance of last year's model and have greeted this one with similar acclaim.
Sunday, 17 June 2012
How to Fix Up and Renew Backyard Chairs

PLASTIC CHAIRS:
Chairs made of plastic composites need only to be cleaned with mild, soapy water and rinsed with a hose. Set the nozzle head on high to remove stubborn dirt or use a pressure sprayer on low setting. Let dry thoroughly. Once dry, lay them out on a large drop cloth. Spray paint them with paint made especially for plastic, following manufacturer's instructions for application and cure time between coats. Feeling adventurous? Atlanta painter Kass Wilson published some great ideas for faux finishing plastic and fiberglass, which you could try on your backyard chairs.
METAL or WROUGHT IRON:
Metal chairs with scratches or rust spots can be taken care of by sanding the worst places with coarse or medium grit sandpaper. Wipe with a damp cloth, then apply a spray primer containing rust preventative. Once dry, give them two coats of exterior grade spray paint, waiting the recommended time in between coats. For ornate wrought iron chairs with cushions, remove the cushions first, or tape over them to prevent damage from overspray. A stiff wire brush will effectively remove any rust and stubborn dirt. Wipe thorough with a damp, textured cloth to remove small particles, or use a tack cloth before priming and painting. Spray paints come in basic colors, but can be found in textured, hammered, bronze or verdigris finishes, all of which are fairly easy to apply and give you a modern, traditional or vintage look.
WOOD or ADIRONDACK STYLE:
Refurbishing wood chairs is not difficult, but it is time consuming due to the extra steps involved in preparing them for re-painting. First, wash the chair(s) with a no-rinse cleaner such as Dirtex or a deck prep product. If there is mold present, remove it with an oxygen-based cleaning solution. Let dry thoroughly. Next, scrape off any loose paint, then sand the entire chair with a 150 grit paper until smooth. If there are any especially rough or splintered edges in the seat or arms, begin by using a coarse grit between 60-80, and switch to 150 grit to smooth out the surface. Vacuum and use a tack cloth to pick up any sawdust residue.
Use a high quality exterior wood primer and apply one coat to entire chair. For extra protection, apply a second coat of primer to areas previously sanded down to bare wood. Follow with two exterior grade topcoats. If you're super creative, think about painting a special design, or mix-and-match stencil designs to give your chairs a unique look.
RATTAN or WICKER:
If you've got the know-how with lots of patience, a rickety or dirty rattan or wicker chair can be transformed into quaint, comfortable seating! Make sure you're able to recognize the difference between rattan or wicker since renovation techniques will depending on the material - rattan is actually a type of wood while wicker refers to the natural materials used to weave the furniture, such as rushes, willow, or even bamboo or straw. Rattan has a stronger core and will typically appear stiffer and much stronger than wicker.
Rattan should be cleaned by brushing away surface dirt and dust. Using a short-bristled brush dipped in a mild soap solution, work from the top down, scrubbing away residual dirt carefully. Rinse the entire chair with plain water, patting it dry with a towel until it is damp, followed by a thorough air drying (this might take a few days). Avoid moving it around too much while it is wet or it could warp or stretch and potentially loosen up the weave. Once dry, if there are loose joints in the frame, re-glue, clamp and let dry. For larger joints, use screws to tighten things up.
Never use a brush to repaint rattan, or paint will clog up the weave and lead to ugly drips. Spray paint is your best bet, applying several light coats of paint, keeping the can at a distance to avoid heavy application. Rattan can also be stained with an oil-based product and finished with a clear topcoat (urethane is not recommended).
Tip: Rattan does not hold up well under severe weather conditions - remember to cover it or store it away in bad weather to keep it looking its best.
Like rattan, wicker should have heavy dirt pre-cleaned out of the weave. You can then use a garden hose to tackle the worst spots, followed by washing with a soft brush and mild soap solution, then rinsed. If mold is present, spray with a mild bleach solution and re-rinse. Dry thoroughly. Don't neglect the underside of the furniture. Unless the piece has major damage, small areas where wicker has been broken or worked loose can be pushed back into place and/or re-glued using wood glue. As with rattan, spray paint will yield the best results using multiple light coats. Follow with a clear topcoat.
Tuesday, 12 June 2012
The One-Minute Solution to Keeping Your Bathroom Clean
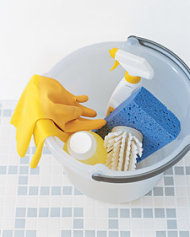
Wipe Down Everything
After showering, take a minute to wipe down the tub and faucets with a terry-cloth towel to help remove soap scum and prevent mineral deposits.
Close the Shower Curtain
Pull the shower curtain closed when not in use, so water can't sit in the folds. Spread towels over two hooks to dry, or hang them on rods instead. Wipe shower walls with a squeegee after every use.
Circulate Air
To discourage mildew growth in the bathroom, increase the amount of air circulation and light to decrease moisture. Use fans during the shower and for roughly 30 minutes after, air conditioners, dehumidifiers, and open windows.
Thursday, 31 May 2012
Get Your Grill Ready for Barbecue Season

Deep-Clean Your Cooker
A charred coating on a grate doesn't add flavor, it's just dirt, says Barry "C.B." Martin, Char-Broil's CGO-that's chief grilling officer. Any shiny black flakes on the underside of the hood are unlikely to be chipping paint; they're burned-on residue, a fire risk. Here, Martin's step-by-step for gunk removal.
The Interior:
Dry-scrub crud from grates, burners, and inside surfaces with a nonscratch sponge or a nylon brush. You can even use an emery cloth or a wire brush on uncoated steel or iron. Then wash surfaces with dish soap and water, rinse well, and dry thoroughly. Martin suggests reseasoning cast-iron or metal grates with oil as you would a similar pan, but there's no need to coat chromed-steel or ceramic grates. Consider replacing these grates if they're rusty or chipping.
Prep the Propane
Do a gas check-it's essential for safe, efficient cooking, especially if a grill's been idle.
Inspect the tank. Run a leak test. Coat the regulator, valves, and hoses with soapy water, then turn on the tank to pressurize the system. Look for bubbles, which indicate escaping gas. Tighten connections and try again; if there's still a leak, replace the hoses or the tank, if need be. Next, if your grill lacks spider guards, use a bottle brush to clear out debris or insect nests from the venturi tubes, which connect gas to burners. Finally, fire up the burners without the grates in place and look for spots that aren't flaming evenly. Once cool, clear any blockages in the burners with a paper clip.
Find and Fix Your Grill's Hot Spots
Even heat is the holy grail of grilling, but it's often not what your burners deliver. To identify the heat pattern, cover grates with slices of white bread and run burners on high for a few minutes. Cut the flame and flip the slices to see which toasted most, indicating where the hot spots are. To even out the heat, add grates of hard-anodized aluminum, an excellent conductor, like GrillGrate (about $40 and up). Or place indirect-heat food on cooler areas and direct-heat food on the warm ones.
Thursday, 24 May 2012
Tips to Unblock Your Kitchen Sink

John Blatchford, Handyman and Operations Manager at ProMaster Home Repair, and Sean Greene, expert at Evidence Solutions Inc., have offered their expert knowledge and experience and gave us some simple DIY tips to unblock your kitchen sink.
Greene recomends pouring some baking soda and vinegar down the drain (about 2-3 tablespoons of each). This helps loosen up a lot of the gunk that gets trapped in your sink, and can help to clear the drain without calling a plumber.
For trickier drain issues, Blatchford suggests different tips to help you conquer the problems once and for all. First, you can wiggle in to get under your sink and remove the "P" trap which is the curving part of the pipe toward the bottom that connects your sink to the wall. There will be 2 plastic screw pieces (collars) --- one on the sink side and one on the wall side of this p trap pipe that can both be loosened and removed to get the P trap off.
This can be pretty easily done with channel-lock pliers, the pliers that adjust to get bigger and smaller. You should loosen these up a bit and once almost off, you can allow for the water that sits in this pipe to drain out into a pan or bucket. Cleaning this out will help the water flow much more easily.
The next place that grime likes to hang out is in what's called the "popup" which is directly under the sink. This is what stops the water flow when you pull the knob on the top side of the sink. There should be a small plastic or metal cap that sticks out and that can be unscrewed and then pulled out, revealing the metal rod and mechanism that often holds grime. Clean this out thoroughly, and your sink should be good to go.
The last thing would be to run the water and make sure your cleaning helped the problem. It's then a good idea to continue to run the water and climb back under to make sure no leaks are going on and that nothing else is corroded or broken.
Sunday, 20 May 2012
10 Most Common Gardening Mistakes

1. MISTAKE: shopping for just flowers, and not foliage.
SOLUTION: "I often tell my customers that every flowering plant is beautiful at its prime - full of lush, abundant blooms," says Flora. "But then I'll ask, 'How does it look for the rest of the year?'" Before you buy, consider the plant's leaves and structure. Include specimens with spectacular foliage, like the annual coleus, the shrub cotinus, or decorative grasses to help keep beds interesting when flowers are not at peak.
2. MISTAKE: Buying insufficient amounts of a single variety.
SOLUTION: "Taking home only one or two pots of a particular specimen is a surefire way to make your garden look hodgepodge," says Flora. Depending on the size of the pot and the type of plant, she suggests buying at least three containers (though six or more of a species is preferred) for a unified, well-designed look.
3. MISTAKE: Purchasing unhealthy or diseased plants.
SOLUTION: Leaves can tell you a lot about the health of the plant. Avoid picking specimens with brown, yellow, or wilted leaves, which could signify poor health (left) or neglect. Also inspect the foliage for insect damage like aphids (little green bugs), scale (translucent bumps or blisters), and spider mites (webs). You don't want to spread pests throughout your garden. Instead, go for plants with lush, perky, vibrant-looking foliage.
4. MISTAKE: Choosing flowers in full bloom.
SOLUTION: "Don't be seduced by pots with abundant flowers," says Flora. Instead, look for healthy foliage and plump buds. Let the plants peak in the ground at your home, rather than in pots at the nursery.
5. MISTAKE: Picking plants with poor root systems.
SOLUTION: Steer clear of anything that is root-bound (you'll notice a mass of roots coming out of the bottom of the container), because tangled roots can suffocate and rob the plant of its nutrients. Also leave those with underdeveloped roots (ask a nursery employee to check) to mature longer at the nursery.
6. MISTAKE: Ignoring the labels.
SOLUTION: The plastic tags sticking out of nursery pots contain vital plant information. In addition to water and light requirements - and bloom times, if applicable - they describe how large a plant will get. While it may seem obvious, mistakes like planting a tall perennial in the front of a border or tucking a dwarf variety toward the back of a bed are very common.
7. MISTAKE: Not knowing the dimensions of your garden.
SOLUTION: Flora recommends bringing a photograph of the bed you are shopping for and the measurements of the space to the nursery, so that employees can help you buy the right number of plants, choose the correct size, and find colors that go well together.
8. MISTAKE: Failing to determine a color scheme.
"All colors can be beautiful, but not all colors can be beautiful together," notes Flora. When you're shopping for plants, don't think of each one separately; instead, consider the plant as part of an ensemble cast. "Gardens look best with a specified color scheme. Pick one you like and stick to it!" recommends Flora. "If you love cool colors like blues and purples, but also want a hot palette of oranges and yellows, put them in different beds."
9. MISTAKE: Waiting too long to put pots in the ground.
SOLUTION: Try to place plants in the ground as soon as you bring them home. To help you figure out where they should go, set the pots out in the beds where you'd like to see them positioned, and then move them around to suit your design. If you have to delay planting, keep them in a shady or partly shady area where they won't dry out and put them in the ground as soon as you can. Don't leave pots in the hot sun where they'll dry out.
10. MISTAKE: Trying to do it all yourself.
SOLUTION: "Ask a lot of questions of nursery staffers. Don't go it alone," advises Flora. She recommends seeking out a local nursery with a knowledgeable crew who is passionate about plants. These establishments are often more adept at knowing what grows best in your region than the big-box stores.
Sunday, 13 May 2012
Top 5 interior design trends to note

Interior design is alive. It constantly evolves over time, reflecting living standards, affluence levels and lifestyles. If you are looking to give your home a fresh new look, do read on for five of the hottest interior design trends shaping the way we currently live. I personally anticipate that they will continue doing so way into the near future.
1: Stepping off the beaten track
Less conventional Asian homes play with colour and reflect the personalities of the occupants. Image courtesy of…People are consciously moving away from more conventional designs. A more adventurous consumer is emerging, someone not afraid of introducing new ideas into their homes. In Asia, this means using new colours and materials in homes, instead of sticking to safe and common colours like neutrals, whites and dark browns. Leaving personal marks around the house is a quick way to make it look less like a showflat and more like a home.
2: Going green
Besides cost and aesthetics, another factor you might like to consider is environmental impact. An increasing number of consumers, well aware that their interior design decisions could affect the environment for better or worse, are showing a growing preference for sustainable options when choosing materials and finishes. These clients seek out better suppliers and contractors who can provide them with excellent sustainable alternatives. If you are renovating your floors, avoid natural stone tiles such as Carrera marble or silver travertine. Instead, opt for manufactured tiles with similar attributes.
3: Sourcing for storage solutions
With the world population on the incline, shrinking living spaces and congested homes have become a common sight. In Singapore, for instance, shoebox units are gaining popularity. Living in small homes means a need to carve out personal living spaces from the clutter; this can be done through the use of better storage solutions in the home. For those with a few extra dollars to spare, companies like IKEA and Howards Storage World can provide you with interesting, well-designed storage solutions. Another tip is to look out for multi-purpose furniture and installations, such as coffee tables that can store newspapers and magazines, or bed frames with pull-out drawers.
4: Living under one roof
The ever-rising cost of home ownership has spurred an emerging trend of multi-generational living. With larger households, the different lifestyles of the young, the old, and everyone else in between are now housed within the same residence. Interior designers have to take into account these multiple, sometimes clashing, lifestyles when coming up with designs. Multi-functional space planning is also growing in importance.
5: Integrating technology into design
Living in the 21st century, it is not surprising to see more homes introducing sophisticated designer technology, especially in the areas of audio-visual entertainment and security enhancement. Both you and your designer should keep abreast of such emerging household technologies when deciding to incorporate them into your renovation plans. This ensures an enhanced total living experience.
Tuesday, 8 May 2012
Leaky Pipes or Leaky Wallet: 5 Tricks of Plumbers

Some specialize in commercial or residential projects, or in a particular type of plumbing application, such as natural gas lines or fire suppression systems. While the majority of plumbers are reputable, the plumbing industry has its fair share of sub-standard contractors who employ shady business practices. Here are the most common problems and recommended cures to prevent a leaky wallet.
1: Inaccurate Estimates
"Inaccurate estimates are the most common way a plumber can get more money out of you," says plumber Dave Buteau of OnDemand Plumbing located in Concord, New Hampshire. He admits, "The hardest part of the job is convincing a potential customer that a low-ball quote is probably not an accurate reflection of the work involved." Buteau says he charges flat-rate fees for standard work and gets calls regularly from people complaining about plumbers who quote them the lowest price, but end up charging twice as much for "additional work" in the long run.
Cure: Unless you've got an emergency situation, take the time to get several quotes and make sure the scope of services is clearly outlined, so you aren't comparing apples to oranges. Get clarification if a contract is not clearly spelled out, and don't be shy about asking a plumber why a price is higher (or lower) than everyone else's price. Most of the time, quotes at extreme ends reflect inaccurate estimations of labor time.
2: Sending in Extra Workers
Next on the list, Dave states, "Is the shady practice of sending in two or more people to do the job, when all that's really needed is one plumber."
"If a plumber is training an apprentice, that's one thing," he adds, "but you shouldn't be charged extra if the job only requires one person to do the work." Some plumbers offer very low hourly rates, fooling the customer into thinking they're getting work done for a bargain. Dave warns, "In the long run, the customer ends up paying higher hourly standard rates than a reputable plumber quoted them originally."
Cure: Ask how many plumbers will be on the job, or if an apprentice will be present, and if any additional fees will be charged. An apprentice should always be supervised by a licensed plumber and their work should be inspected. Also, common sense dictates need - if you're having a sink or faucet replaced, it's certainly not a job requiring more than one plumber. If you're plumbing a brand new home, that's a big job and typically more than one plumber will be on the premises to get the work done in a timely manner.
3: Bait and Switch
Plumbers can easily sway an unknowing customer into purchasing more expensive products (such as heating/hot water appliances) with over-charging for parts, use of sub-standard materials, or the infamous "bait and switch." Likewise, they can switch out high grade materials for a lower grade, increasing profit margins without the customer being aware of the short-change in goods.
Cure: Find out what kind of materials your plumber intends to use and list it in the contract or service order; that way, you'll be able to hold him accountable if future problems show up. Compare prices of materials at local plumbing suppliers or hardware stores. Most plumbing supplies to complete household repairs cost little - such as washers, gaskets, and O-rings - so you should watch out for exorbitant material fees. While you should allow your plumber a slight mark-up to cover his overhead and operating expenses, stay away companies which consistently charge more than ten to fifteen percent more than the cost of materials.
4: High Cost for the First Hour of Labor
Standard hourly visits are expensive for the first hour of labor, even if it takes only ten minutes to fix a simple problem.
Cure: While you can't fault a plumber for charging a minimum labor charge to cover his time and travel, you can take advantage of that full hour of labor you're paying for by having him resolve any small problems or perform routine maintenance tasks to get your money's worth. Ask him to replace washers, gaskets or O-rings, tighten faucet stems or other small tasks around the home, or ask him for a quick inspection so you'll be able to identify where wear and tear might indicate future problems will develop.
5: Markups in Affluent Neighborhoods
Live in an affluent neighborhood? Expect a markup on pricing from plumbers who will think they can get more out of you.
Cure: Do your homework - call around and get quotes from plumbers based in not-so-affluent towns. Often their prices will be more reasonable and they'll appreciate the increased business. Caveat: To make sure they won't charge for extra travel time, keep the commute time down - if they have to travel more than an hour to get to you, expect that to be reflected in the quote.
Thursday, 26 April 2012
How to Organize Your Accessories
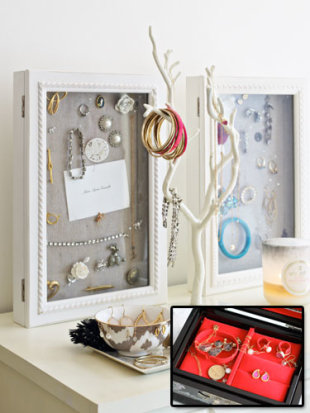
So she thought outside the box-no standard jewelry cases or plastic bins here-and came up with clever storage solutions that combine function and fashion. Now all her favorite finishing touches, like the perfect pair of earrings or colorful scarf, are on display right at her fingertips.
Keep favorites handy
Grab-and-go scarves now live in a glass bowl on Jess's dresser. "I'm more likely to wear my scarves if I see them every day," she says. "And I love having that pop of color in my room."
Tip: Check around the house. The bowls Jess uses for her scarves and everyday jewelry came straight from her kitchen. What's better than free storage?
Showcase mementos
Jess displays her grandmother's jewelry in shadowboxes she bought at HomeGoods. The linen and foam backing makes pinning in earrings easy. For necklaces and bracelets, follow Jess's lead and hang them from pearl-tipped straight pins. "Now my special-occasion pieces are protected from dust, and the effect is so pretty it looks like artwork in my bedroom."
Tip: Look for inspiration. Jess stole her shadowbox idea from her design business. She's used similar boxes to display her wares at trunk shows. This one from Pottery Barn Teen can either hang on the wall or sit atop your dresser.
Store it pretty
Jess places her everyday reliables in a cute bowl atop a small tray. To keep pieces from getting tangled, she hangs earrings around the edge of the bowl and places rings in the center. "This is a lot nicer than just tossing my jewelry on the dresser, and much easier than digging through a box," she says. Place this fun tray beneath your "jewelry" bowls to catch overflow earrings, your watch and other trinkets in need of a home.
Tip: Loosen up. Some accessories don't have to be piled into perfect stacks or lined up in neat rows. Corraling your stuff casually makes it look more fun.
Let it hang
Need even more storage? Hang necklaces and bracelets on a cool metal jewelry tree like this one from West Elm.
Tip: Think of organizing as decorating. Don't just ask yourself, How can I store this? Ask, How can I store this in a way that looks good? Try to make it special.
Get the look
The key to pulling together a cohesive look: Find underused space. Jess puts her overflow accessories, like extra belts, in an empty nightstand drawer outfitted with a low-cost organizer.
Friday, 20 April 2012
3 Ways to Create a Gorgeous Bouquet with $10 or Less

Many retailers receive their flower shipments on Friday mornings (in preparation for the weekend rush) and Mondays (when they need to replenish stock), but you should get to know the clerk who stocks the flowers at your local supermarket or corner store, who can tell you the exact delivery days, says entertaining expert Matthew Mead.
Aside from wilted petals and dry leaves, an easy way to determine a bouquet's freshness is to look at the bottom of the stems. Just as with asparagus, you should see white and green fibers in the center. Any brown or mushiness means the flowers have been sitting in stale water for a few days, says Meredith Waga Perez, owner of Belle Fleur in New York City.
Encourage Shy Buds to Open Up
Opting for flowers that haven't bloomed means you'll be able to enjoy them for longer, but it can take some varieties (like the hybrid tea rose, the class most commonly found in grocery stores) up to six days to fully open, says Beth Smiley of the American Rose Society.
While putting flowers in a sunny window will speed up the process, Waga Perez says it can make the petals soft and cause them to wilt. It's best to keep the stems in warm water that contains Floralife (the powdered flower food that comes with most bouquets) and put the arrangement in a cool place away from direct rays. For bulb varieties that follow the light (like tulips), she recommends placing them directly under a chandelier or tall lamp to prevent the heads from drooping and to keep the plant growing straight up. If your flowers have woody stems (like forsythia), a vase containing equal parts seltzer and tap water will maintain the pH these varieties require, says Mead.
You know to cut about an inch off the bottom of each stem when you get a bouquet home, but to extend the shelf life of your arrangement, each day following, recut about a quarter of an inch off the stems and change (not just top off) the water.
Skip the Middleman
Many florists receive their flowers directly from farms within two days of being cut (which explains their higher price). The premade bouquets that you see in supermarkets, however, are assembled by a third party in large plants off-site and spend more time in transit. And often, old flowers are mixed with new ones, says Waga Perez. To get more flowers for your money and guarantee their freshness, buy single-variety bunches that are more likely to have been picked at the same time.
Carnations, which can seem cheap in an arrangement, look like luxurious, ruffled fabric when grouped alone in a tight cluster, says Waga Perez. Not to mention they're readily available all year, are affordable (about 30 cents a stem) and can last up to two weeks. Daisies, pincushion chrysanthemums and hydrangeas (a flower easily grown in greenhouses) are also hardy, budget-friendly options, says Mead.

Thursday, 5 April 2012
Budget kitchen makeover ideas

1. Add a modern mantle shelf over your kitchen window
In many older kitchens the kitchen cabinets stop abruptly to make room for a kitchen window. To bridge the gap between your kitchen cabinets with a budget kitchen makeover idea, consider hanging a mantelpiece shelf over the window (at the same height as the top of your kitchen cabinets). You'll find mantelpiece shelves at home improvement stores. Once up, the shelf can be used to display kitchen decor.
2. Faux paint your kitchen cabinets
For a high impact budget kitchen makeover idea, consider painting your kitchen cabinets with a faux finish. To prepare the old surface, simply paint it with water-based primer, which looks like white paint. Once the primer dries, use a sea sponge to dab on three shades on to your cabinets, such as sand, taupe and plum. Feel free to streak the contrast shade (plum) with a paint brush, going up and down.
3. Spray paint your old kitchen hardware
Instead of replacing old kitchen hardware, consider painting it with metallic paint. Spray paint primer on to the hardware first, to prepare the surface. Next, complete this budget kitchen makeover idea by choosing a shade of metal paint that matches your kitchen (I chose copper). And if the screws show through your kitchen hardware, be sure to spray paint them as well.
4. Paint your old fridge with stainless steel paint
If you wish to give your old fridge a modern look, consider painting it with stainless steel paint. Unlike other paint jobs, however, this budget kitchen makeover idea requires precision. Follow this step-by-step guide to painting your fridge with stainless steel paint. Once finished your fridge will look completely transformed.
5. Create a PVC kitchen backsplash
If your old kitchen backsplash is chipped or simply old-fashioned, consider covering it with modern PVC tiles. This budget kitchen makeover works just as well if you don't have a backsplash at all. Look for a set of self-adhesive wall tiles that complement the colors and design of your kitchen. Once up, your PVC backsplash will look like a real tile backsplash.
6. Make kitchen wall art
Using craft store frames, you can make your own kitchen wall art at home. There are many ways to implement this budget kitchen makeover idea, but my favorite items to frame are kitchen towels. Be sure to choose brand new towels depicting a pastoral scene, like wine bottles or a herb garden. Remember that you can paint your frames to match your faux kitchen cabinets.
Sunday, 1 April 2012
Are You Doing Your Laundry Wrong?

PRE-TREATING IS PRIORITY

Tip: If you get a stain on your pants and don't plan to wash clothes for a few days, tie the pants in a knot as a reminder that it needs special attention. You can also put a clothespin at the area to mark the spot that needs to be treated.
KEEPING WHITES - WHITE

SHRINKAGE

MOST COMMON OOPS

Using too much detergent - Using extra detergent will not get your clothes cleaner. The unrinsed detergent residues can coat the fibers and will affect how the fabric breathes. Clothes that breathe easily, like cotton, make you feel cooler and absorb perspiration. Fabrics that don't breathe make you feel hot, sticking and slimy.
Using too much fabric softener - We all love soft clothes, but when you use too much fabric softener it can create an oily film on the fabric. This film can make your clothes feel slimy when you wear them and will decrease water absorbency of towels.
Wednesday, 21 March 2012
5 Incredible Home Nurseries

As soon as you bring your little one home, you'll be spending a lot of time in the nursery, so you need to make sure it's a space that makes you feel cozy. Need some ideas for a room of baby's own? These 5 amazing nurseries will definitely inspire you to get decorating.
1. Pixel Art
Don't be afraid to put eye-catching art in a nursery. Grown-ups aren't the only ones who enjoy it! This Ixxi Bambi artpiece makes the room. And if you want to make your own pixel masterpiece, you can use paint samples or Post-it notes.
2. Modern and Vintage
This nursery mixed with modern and vintage accents is warm, cheerful, and way more sophisticated than one full of plastic toys. I love that the modern yellow rug looks like a plush spill.
3. Bold Wallpaper
Sweet dreams are in the stars with wallpaper like this! The pastel color keeps the large print from overwhelming the room, but adds more drama than your standard baby-friendly print.
4. Dipped Crib
Color-blocking is trendy this season, and it's not just for your clothes. This color-dipped look turns a nursery staple into a piece of art. It also gives baby an early lesson in complementary colors.
5. Black and White
Most baby toys comes in bright primary colors or pastels blues and pinks. But babies are also visually stimulated by black and white. And who wouldn't be in a nursery this chic?

Saturday, 17 March 2012
Tips for Hosting a Kid's Party

With her new line of crafts hitting the Home Shopping Network on March 13 and the April 3 release of her first party-planning book, CelebraTORI: Unleashing Your Inner Party Planner to Entertain Friends and Family, Spelling shared her secrets for turning a ho-hum shindig into an event everyone will remember.
1. Make It a Family Affair
Spelling's top party planning tip is to let the children help out. "Stuff I can get [my kids] involved with always pays off more, because they take pride in it," she says. While young children may not be able to book a venue or plan a menu, they can help you choose the colors and theme of the party, arrange tables, and help with invites.
2. Listen to Your Kid
Enlisting your child for help also means paying attention to what they really want. When Spelling and hubby Dean McDermott tried to plan an elaborate SpongeBob SquarePants party for their son Liam's fifth birthday, little Liam spoke up.
"In my head I'm like, 'SpongeBob SquarePants, what can I get?' and I'm thinking of a million things," Spelling says. "Then Liam says, 'Listen, I just want a piñata.'" In response, Spelling scaled the party back and planned to incorporate a piñata instead. "Take a lesson from your kid," she adds. "It's like when you buy all those presents, and the kid plays with the box."
3. Too Many Presents Are Overkill
Guests are bound to bring a ton of gifts to birthday parties, which means parents don't have to go nuts in that department. Spelling says she used to get Liam many presents for his birthday, but in the end he was overwhelmed with all the gifts he was given. Then her husband, McDermott, suggested they just get Liam one great present to open at the end of the party: "He was like, 'Let him open all his friends' presents first, because by the time he gets to our present, he won't care anyway," Spelling says. Turns out McDermott's theory was right - and it saved them money!
4. Replace Pricey Desserts with Candy
Instead of blowing your bank on high-priced desserts, Spelling suggests offering candy, which goes over just as well for the underage crowd and keeps costs down. "You don't need to have an elaborate dessert if you have little candies out in different jars that you can collect from your house," Spelling says. Plus, candy jars can double as budget-friendly take-home gifts for tykes to enjoy later.
5. Craft It Up
A little glitter, some Elmer's glue, and a great project idea that matches the party theme can go a long way when it comes to keeping kids entertained. "Kids love it," says Spelling, whose new craft line includes kits stocked with crafting materials and tools. "If it's a pirate party, they can make their own eye patches and swords. If it's a princess party, they can make their own tiaras."
Having an adult-supervised craft station also provides a break for kids who may not be social butterflies, a quiet spot for parents, and a focused activity where everyone can funnel their creativity and energy.
By: Christina Couch
Saturday, 10 March 2012
Beware! 4 common contractor rip-offs

Not everybody plays fair! That's a lesson you learn in elementary school. But when it comes to spending hard-earned money to build or remodel your home, unless you know what to watch out for, it's difficult to identify when a contractor is breaking rules at your expense. Don't assume your contractor isn't cheating at the home improvement game because everything appears in good order on the surface. These are common ways contractors secretly cheat you:
1. Cutting Corners:
Contractors save themselves labor time by skimping in small ways that add up over the duration of a project. Homes hit by hurricanes suffer the most damage from improperly secured roofing and poor framing. Roofing installers may use a minimal amount of fasteners on shingles. Over time, shingles will buckle and may lift and separate under windy conditions, increasing risk of leaks in stormy weather. Skimping on fasteners allows a contractor to put together a home in record time, and reduces the expense of materials included in a basic building package.
Remodeling contractors practice this on a smaller scale, by not placing an adequate number nails in subflooring or minimally attaching sheetrock to save time on plastering. Eventually, seams show through poorly installed walls and screws hastily placed will work their way to the surface and appear as small bumps. Floors squeak from poor subfloor installation and at worst, wood flooring will warp and tile will crack after being installed on a loose subfloor.
2. The "Bait and Switch":
Some contractors offer a package plan and wait until the project is well underway before advising a product is unavailable or "discontinued", offering more expensive upgrades. Likewise, some contractors promise high-end materials and switch to lower grades without clients realizing it.
For example, they may install cedar shingles with galvanized nails rather than stainless steel. On the surface, it's difficult to distinguish the difference between fasteners when looking at the top of a small nail head embedded in the surface of the shingle. Another example would be switching out an aluminum drip edge with a sheet metal drip edge - a product the average homeowners may not recognize. The contractor walks away with a high-grade profit for a low-grade product.
3. Omitting the Prep:
A contractor can omit prep work to reduce labor time and increase profit margins. Common infractions involve painting projects as well as roofing or installation of doors and windows. Painters skip out on priming new walls by painting only newer seams with primer (or in worst case, don't prime at all). In a short period of time, walls appear dull, colors fade and you begin to notice inconsistencies in surface appearance.
Roofers fail to flash properly, applying tar that dries out in a year or so and provides little to no protection from leaks. Exterior doors and windows are installed but not properly insulated - a "cheat" tactic that goes undetected once trim is applied to framing. Holes and gaps in doors and windows cost homeowners thousands of dollars in heating and cooling costs annually and greatly reduces the comfort of a home.
4. Materials Overcharge:
Familiarize yourself with pricing on materials, especially big ticket items like doors and windows bought in bulk. Find out what suppliers your contractor is dealing with and inquire directly about retail and wholesale pricing. Ask your contractor if he intends to mark up his materials and set a cap in your contract; otherwise, you run the risk of over-paying and he gets more profit than he should to offset his overhead. Ask for credit for returned items, receipts for purchases.
How You Can Protect Yourself from Unfair Practices
First, make yourself available to inspect your project regularly, daily if possible. The best protection is a good set of eyes. For small projects, tap into the expertise of a family member or friend with more experience, or find people who have done similar projects on a site like Hometalk.com. Don't be shy about asking your contractor questions, especially if something strikes as you as incorrect.
Look at details like spacing and the number of fasteners used in framing or flooring. Note whether construction looks neat or sloppy, a telltale sign of good or bad workmanship. Ask for "inspection" meetings at specific completion points. Good contractors will take pride in their work at every stage of the project.
Next, make sure the original contract protects you from the "bait and switch" by stating if a product included in your package become unavailable, a comparable product will be provided. If a comparable product cannot be found, ask for an upgrade at no extra cost.
Finally, if you don't have the time or inclination to act as an informal inspector, consider hiring an independent professional to act as your watchdog. Outside resources can educate and assist including local building inspectors. Blaine Illingworth, senior home inspector and technical consultant, has been an active member of the national board of The American Society of Home Inspectors (ASHI) since 1992.
ASHI is an organization "building consumer awareness…covering all of a home's major systems." Illingworth recommends homeowners consider hiring a home inspector to monitor building projects because "they have a pool of knowledge in every trade and know how they should interface and are fully equipped to recognize substandard work."
Thursday, 1 March 2012
Your Sun Sign Element and Your Happy Home!

Fire signs: Aries, Leo, Sagittarius
Fire signs feel most at home when their environment is fun and playful. You're easily bored by decor that's overly conventional, so pep up your place with bold colors, accessories and art that reflect your upbeat spirit. A home gym will help you work off excess energy and keep you strong. And make sure you have a special space where you can take time out to cool down when your temper gets the best of you!

An eco-friendly home feels most comfortable to Earth signs. Organic materials, plants and other natural design elements will not only soothe your nervous system, but please your senses as well. Rather than opt for less substantial materials, look for furniture that's well-made and long-lasting. Food is also particularly important to Earth signs, so make sure your kitchen is practical and user-friendly. Anything in your home that's too fussy or ornamental will irritate you. After all, you thrive on simplicity.
Air signs: Gemini, Libra, Aquarius
If you're an Air sign, cozy means having a home where socializing takes center stage. You'll want to set up your kitchen in a way that allows you to talk with your guests as you cook. Create a spacious environment where people can come and go with ease. Finally, don't forget to have a room to which you can retreat and ground yourself when your airy nature becomes overstimulated!
Water signs: Cancer, Scorpio, Pisces
As long as Water signs are surrounded by those they love or at least reminders of them, their house will feel like a home. Emphasize family pictures and heirlooms in your decor, and pay homage to the past with antiques and vintage fabrics. You need your home to be a haven you can retreat to when the outside world overwhelms, so aim for a healing aesthetic that calms and relaxes you.

Subscribe to:
Posts (Atom)